> ## Documentation Index
> Fetch the complete documentation index at: https://inquery-docs.com/llms.txt
> Use this file to discover all available pages before exploring further.
# Sections
> Manage your sections
A Section is a sequence of consecutive pages in a file that pertain to a specific topic. InQuery will add multiple bookmarks to each file to delineate document sections, since there are often multiple relevant sections in a single file.
## Tagging and Labeling
Each section is automatically labeled with a document tag.
The list of tags can be customized by each organization for different case types upon request.
Our default list includes the following tags:
* IME 3
* IME 4
* IME 5
* Cover Letter
* Other Forms
* Injury Reports
* C-3 Form
* Job Description
* Provider Notes
* Operative Notes
* Injections
* Imaging
* Other Testing (Labs, EKG, Etc.)
* Physical Therapy
* Occupational Therapy
* Chiropractic Therapy
* Acupuncture Therapy
* Hospital/ER Records
* Peer Reviews
* C4 Forms
* C4 Auth Forms
* C4.2 Forms
* MG-2 Forms
* IME's
* Misc. (Anything not listed here)
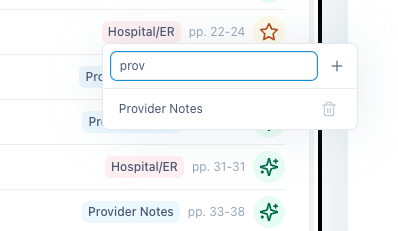
To edit a tag for any document, simply click on the existing tag to open the dropdown tag editor and search for your preferred tag.
Currently, any filtering or sorting will need to be reapplied after editing tags to keep the order consistent.
 To modify which tags are used for each case, please reach out to a member of our team.
Coming soon: self-serve tag management.
## Edit Section Information
To edit a section's date, click on the existing date to open the date picker and select your preferred date or hit clear and click away from the date picker to mark a section with "no date".
To change the title of a section, click on the existing title to open the title editor and type in your preferred title, then click away from the title editor to save the changes.
To change the provider name of a section, click on the existing provider name to open the provider name editor and type in your preferred provider name, then click away from the provider name editor to save the changes.
To change the institution of a section, click on the existing institution to open the institution editor and type in your preferred institution, then click away from the institution editor to save the changes.
To change a section's relevance score, click on the existing relevance score to open the relevance dropdown and select your preferred relevance score.
## Grouping records
To group records together, click on the "Group by Document Type" button indicated by the stack of papers icon in the exhibit list tool section.
This button will automatically group together all records with the same tag. Any sections labeled as "Provider Notes" will be sub-grouped by the name of the treating physician/provider.
Click this button again to ungroup the records.
To modify which tags are used for each case, please reach out to a member of our team.
Coming soon: self-serve tag management.
## Edit Section Information
To edit a section's date, click on the existing date to open the date picker and select your preferred date or hit clear and click away from the date picker to mark a section with "no date".
To change the title of a section, click on the existing title to open the title editor and type in your preferred title, then click away from the title editor to save the changes.
To change the provider name of a section, click on the existing provider name to open the provider name editor and type in your preferred provider name, then click away from the provider name editor to save the changes.
To change the institution of a section, click on the existing institution to open the institution editor and type in your preferred institution, then click away from the institution editor to save the changes.
To change a section's relevance score, click on the existing relevance score to open the relevance dropdown and select your preferred relevance score.
## Grouping records
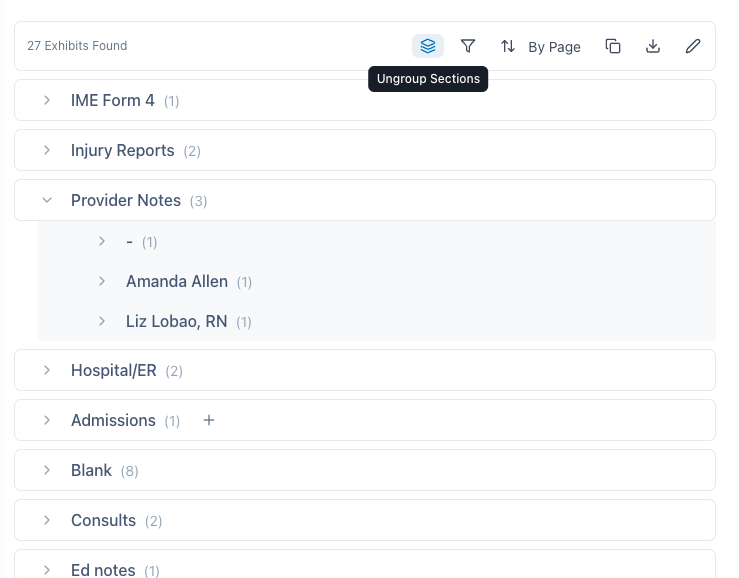
To group records together, click on the "Group by Document Type" button indicated by the stack of papers icon in the exhibit list tool section.
This button will automatically group together all records with the same tag. Any sections labeled as "Provider Notes" will be sub-grouped by the name of the treating physician/provider.
Click this button again to ungroup the records.
 ## Sorting Records
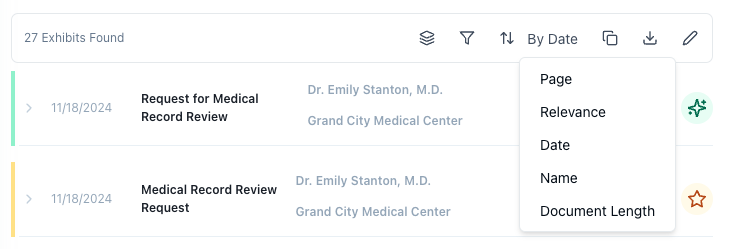
Records/sections can be sorted by page number, relevance score, date, title, or the length of the document.
## Sorting Records
Records/sections can be sorted by page number, relevance score, date, title, or the length of the document.
 They can be sorted before or after they've been grouped into their respective document types.
For a given sort feature, the records can be sorted in either ascending or descending order, which you can control using the up and down arrows next to the sort feature selector.
They can be sorted before or after they've been grouped into their respective document types.
For a given sort feature, the records can be sorted in either ascending or descending order, which you can control using the up and down arrows next to the sort feature selector.
 ## Filtering Records
InQuery gives users many different ways to filter out pages and records from the exhibit list and the final case file.
Users may want to filter out pages that are blank, duplicate, or otherwise not relevant to the case, like fax cover sheets or administrative forms that are not relevant to the case.
The main way to filter out records in InQuery is at the record level, which can be done by using the "Filter" button in the exhibit list tool section.
## Filtering Records
InQuery gives users many different ways to filter out pages and records from the exhibit list and the final case file.
Users may want to filter out pages that are blank, duplicate, or otherwise not relevant to the case, like fax cover sheets or administrative forms that are not relevant to the case.
The main way to filter out records in InQuery is at the record level, which can be done by using the "Filter" button in the exhibit list tool section.
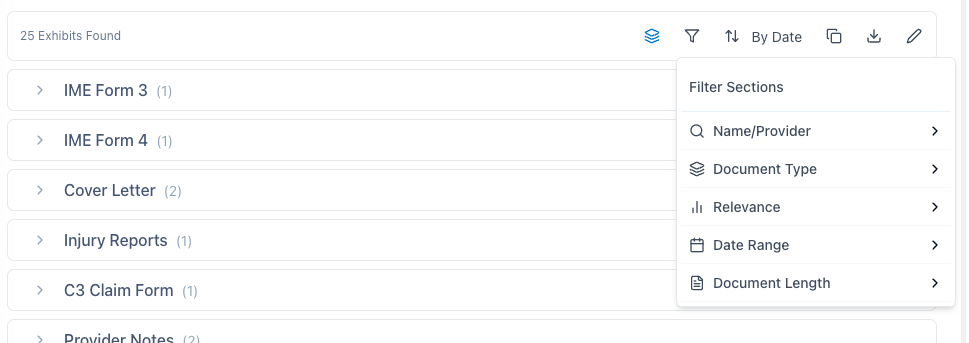 You can filter records by the provider name, document type, tag, or relevance score. You can apply multiple filters at once.
Document name lets you search your records by name. Simply type in part or all of the name you're looking for and InQuery will filter the records accordingly.
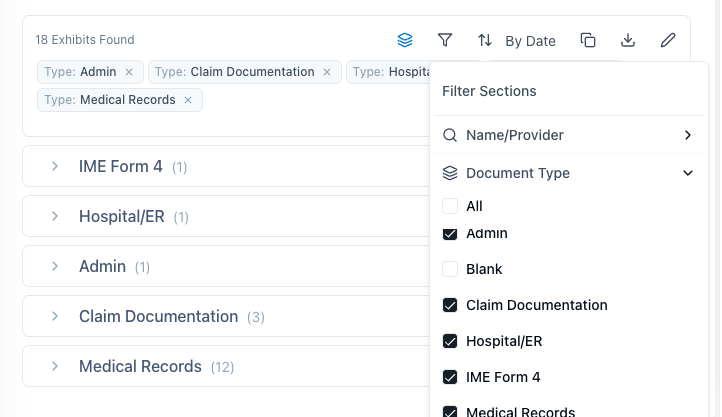
The Document Type selector allows you to choose which records to include based on the document type. In most cases, you will want to select "All" to include all records and then filter out document types that are not relevant to the case.
You can filter records by the provider name, document type, tag, or relevance score. You can apply multiple filters at once.
Document name lets you search your records by name. Simply type in part or all of the name you're looking for and InQuery will filter the records accordingly.
The Document Type selector allows you to choose which records to include based on the document type. In most cases, you will want to select "All" to include all records and then filter out document types that are not relevant to the case.
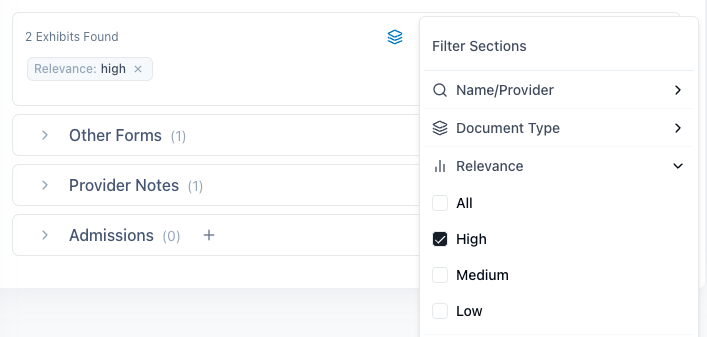
 The Relevance filter allows you to choose which records to include based on the relevance score. In most cases, you will want to select "All" to include all records and then filter out records that are not relevant to the case.
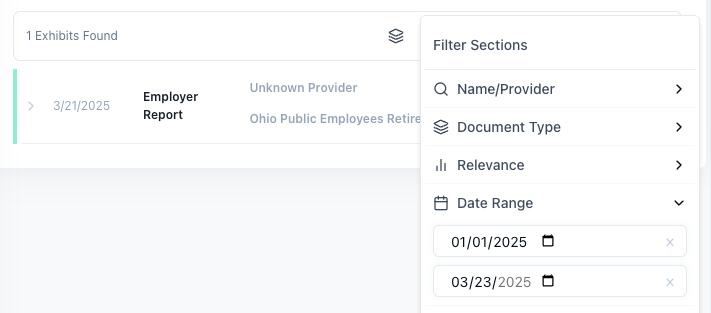
 The Date Range filter allows you to choose which records to include based on the date range.
To filter by date, enter a start date in the first field and an end date in the second field.
Click on the "x" icon to clear the date range filter.
The Date Range filter allows you to choose which records to include based on the date range.
To filter by date, enter a start date in the first field and an end date in the second field.
Click on the "x" icon to clear the date range filter.
 ## Customizing Name and Tag Defaults
InQuery applies a standard set of naming conventions and a default set of tags to the records in your case.
These defaults can be customized by each organization and for different case types upon request.
## Re-run the Executive Summary
You can re-run the executive summary at any time by clicking the refresh next to the executive summary header.
The executive summary only considers sections that have not been filtered out and pages that have not been hidden from view, so you can optionally filter out content from the executive summary that you think may be sensitive or otherwise not relevant to the case.
## Customizing Name and Tag Defaults
InQuery applies a standard set of naming conventions and a default set of tags to the records in your case.
These defaults can be customized by each organization and for different case types upon request.
## Re-run the Executive Summary
You can re-run the executive summary at any time by clicking the refresh next to the executive summary header.
The executive summary only considers sections that have not been filtered out and pages that have not been hidden from view, so you can optionally filter out content from the executive summary that you think may be sensitive or otherwise not relevant to the case.